June 27, 2011

Berry Yummy, Angel Food Cake

It's berry picking season. Time to look up local farms and see if they offer pick your own. There's nothing quite like being out in the sun, plucking ripe berries right from the vine with a basket swung over your shoulder, as you shovel strawberries directly into your mouth. Not that I'm speaking from personal experience or anything. Because that would be wrong...

Eating fresh berries that you've just picked is like nothing else. You can almost taste the warmth of the sun in every berry. Fresh, fresh, fresh.

Before you know it you have an entire basket full of berries to bring home. That you have to eat up in a week. Hmmm...


Berries are excellent on cake. Angel food cake with fresh fruit and maybe a dash of vanilla ice cream would be a perfect solution, no?

If you don't have berries, you could spread high quality jam on each slice and cover in whipped cream.


Angel food cake is a soft sponge. It's light and airy texture makes it a delightful summer treat when heavier desserts just aren't as appealing.


Angel Food Cake
Recipe from the Betty Crocker Cookbook
(serves 12)

Ingredients:
1 1/2 cups powdered sugar
1 cup cake flour
1 1/2 cups large egg whites (roughly 12 eggs worth)
1 1/2 teaspoons cream of tartar
1 cup granulated sugar
1 1/2 teaspoons vanilla extract
1/2 almond extract
1/4 teaspoon salt

Place the oven rack in the lowest position and preheat the oven to 375 degrees.

Mix together the powdered sugar and flour. In another bowl, beat the egg whites with the cream of tartar. The eggs should become foamy. Add the granulated sugar a few tablespoons at a time, beating the mixture constantly on high speed. With the last few tablespoons of sugar, add the almond and vanilla extracts with the salt.

Continue beating the mixture until stiff peaks form. The mixture will be glossy. It is very important to not underbeat. Stiff peaks can be tested by gently dipping the head of the mixer into the egg whites. Pull the beaters out. Check the shape of the mixture clinging to the beaters, which should be similar to the shape of a mountain peak. If the whites hold their shape firmly even if you gently rotate the beaters back and forth manually, then you have stiff peaks and can move on to the next step.

Bring back the powdered sugar mixture and sprinkle small amounts over the egg mixture, about 1/4 of a cup at a time. Fold into the egg whites with a spatula until combined. It is important to be gentle and to only mix until the mixture is absorbed, as to not deflate the egg whites.

Scrape the batter into a 10 x 4 inch tube pan. Cut once through the batter with a knife or metal spatula to break any possible air pockets.

Bake 30-35 minutes. The cracks on top of the cake should feel dry and should spring back when touched gently.

Cooling the cake is important to do correctly. Angel food cake cools upside-down. If your foam cake pan has feet to allow the top, simply flip the cake over and let cool on your countertop. Otherwise use a heat proof bottle or funnel. Insert the bottle through the hole in the cake. It seems like a small thing, but it is important to test that the bottle will fit and balance the pan correctly before baking. Otherwise you may find yourself trying and failing to hold onto an extremely hot pan, while you search through your cabinet for bottles that are strong enough to hold up a cake. Ouch.

Let the cake cool for 2 hours or so until completely cooled. Flip the pan upright. Using a plastic knife loosen the edges of the cake from the pan. Remove cake. Serve.

June 16, 2011

Toffee Bars

Start with a buttery cookie base- followed with a layer of melted milk chocolate with chopped walnuts sprinkled on top. And what do you get? Toffee bars.

The sweetest kindest bar cookie on the block.

This is the cookie to make for friends, neighbors, new roommates or just people you want to impress the heck out of for minimum effort.


Why is it an impressive cookie?

1. It's easy to make, because it's not a drop cookie that is baked individually, but a bar cookie. You plop all the dough in on pan and bake it like a cake.

2. It has "layers", but isn't as complex as say-- a 7-layer bar recipe. Again, Easy-Bake Oven easy.

3. A toffee bar is not a chocolate chip cookie. Nor does it contain chocolate chips in any form. This automatically makes it an interesting alternative to the norm. And if you bring it to a block party, you avoid that awkward moment that comes from realizing you brought the same dessert as someone else. Oooh, burn.

4. Each cookie comes with a list of references, witty conversation starters and is bilingual.

5. It is composed of simple flavors that everyone enjoys, so it's bound to be a hit among all ages.

6. If you make an angel food cake or meringues with it, you can use up an excess egg yolk. Yeah. It is that awesome.

7. It's something to do during the summer with excess chocolate, (if there is indeed such a thing), besides making s'mores. Mmm...s'mores.

Toffee Bars
(makes 32 cookies)
From the Betty Crocker Cookbook
Ingredients:
1 cup butter (softened)
1 cup brown sugar (packed)
1 tsp vanilla
1 egg yolk
2 cups all purpose flour
1/4 tsp salt
2/3 cup milk chocolate chips/bar
1/2 chopped walnuts (optional)

Preheat oven to 350 degrees.

Mix together the butter, brown sugar, vanilla and egg yolk in a large bowl or mixer. Add flour and salt slowly to the mixture, stirring until combined.

Scrape into an 13x9x2 inch pan. Press down on dough gently to create an even surface. Take care that the edges are level as well.

Bake for 25 to 30 minutes. The bars should be a light brown and will still be soft.

Remove from the oven and immediately sprinkled the chocolate pieces evenly over the crust. As the heat begins to melt the chocolate spread evenly over the cookies. Add nuts to the warm chocolate.


Let bars cool completely in pan on a wire rack. Cut into 32 pieces.

Tip: If you over bake the crust, pop the cookies into an airtight container with a lid. Add a slice of bread and seal the container. Leave overnight. The toffee bars will soften.
The bread will be hard as a rock. You won't be able to save it. Sorry.
Nab a free slice of bread from your dining hall if you can. Just make sure it isn't already stale.

June 14, 2011

Matzah Brei

The school year is winding down, homework is grinding to a halt and suddenly you have more projects and finals than you know what to do with. Another thing winding down? Your meal plan. Suddenly your social life increases as you cling like a sea lichen to various people you sat next to that one time in college writing, because they happen to have some extra points on their meal card. This makes for some awkward conversations as you attempt to bum your way through the next few weeks.

But, fortunately you are one of the lucky ones! You have access to a kitchen. And this kitchen has working appliances, like a stove and an oven. Yay!

Unfortunately, you're just about broke. So, retract that last yay.

What to do?

Hey, remember those Jewish friends you have? The ones who celebrate Passover? I bet they have a ton of leftover food you could have. Probably several boxes of matzah under the sink. And trust me, they won't be touching that stuff for another year anyway. It's a Jew thing.


Don't know anybody who has extra matzah? Time to check out that discounted aisle at the supermarket.

So now you and your several boxes of life-giving matzah are in the kitchen. You've had matzah toast with jam, matzah crackers in your chicken noodle soup and matzah sandwiches that have crumbled onto your lap, and you're feeling a little iffy about my advice.

Sorry about that. You have tons of eggs, right? Here, have a recipe. It's like making french toast and a large omelette at the same time. It's fantastic.

Matzah Brei
(Recipe from The Jewish Holiday Kitchen by Joan Nathan)
serves 3-4 people

Ingredients:
Boiling Water
3 sheets of Matzah
2 eggs
salt and pepper (to taste)
butter (for frying)

Boil and pour the hot water into a large heat resistant bowl. Take the matzah and break into pieces, dropping them into the bowl.  Allow the matzah to soak for 15 minutes. Drain. Gently squeeze the excess moisture from the matzot.

Place the matzah back into the bowl.
Crack the two eggs into a small dish. Gently beat the eggs with a folk, just enough to separate the yolk. Add salt and pepper. Pour mixture over the matzah.

Butter your skillet or just a flat frying pan.You shouldn't need more than a tablespoon of butter at a time if you're making in two batches, but feel free to use less if you are making smaller portions. If you have a large pan, you can pour the entire mixture into the pan at once. Allow it to cook for 3-4 minutes or until it is brown on one side.

Flip and cook for an additional 3-4 minutes.

Serve warm.

Drizzle maple syrup or honey on top. Add cinnamon if desired.

May 22, 2011

Welcome Summer- Let's Get Cooking...

Well, you know how sometimes life get's in the way of other plans? Like this blog for example. I wanted to update on time, I really did, but I had some personal matters to attend too that kept me from doing so. During my brief hiatus I have been cooking and baking away, taking plenty of pictures for you to enjoy. Now that it's summer, I will be able to update this blog more frequently.

Food to look forward to includes out-of-season classics like pumpkin pie --- matzah brei--- crispy panfried polenta --- and spicy pumpkin soup.

Because, why should the time of year control what you eat?


Okay, I'll have ice cream sandwiches for you too. Fine...


What's your favorite summer food that's out of season (or not)?


As always, feel free to comment or to email me directly at hitmewithafryingpan@gmail.com if you have any comments, questions or suggestions. Happy munching! - Liza.

April 4, 2011

White Chocolate Brownies

Mmm.... my feeling about baking is, when you've mixed all the ingredients together and are just about ready to pour the mixture into the pan, if you look down and go- OH MY, WHAT IS THAT THING, then perhaps it hasn't been a worthwhile endeavor.  But, if as you mix, you look down and lick your lips because it looks so scrumptious, that your tempted to stick your hands in the batter before it's even ready to pop into the oven-


-all the better.


These are extremely sugary brownies.

A square is like biting into an amazingly rich piece of yellow cake.

I recommend having a glass of milk at hand at all times in case of an emergency.


The top makes me think of roasting marshmallows.


Here, let me cut you a slice...


White Chocolate Brownies
(Recipe from Two Peas and Their Pod, adapted from Tartelette)
Makes 24 small squares

6 tablespoons unsalted butter
8 ounces white chocolate/chips
2 eggs
1/4 cup sugar
1/2 tablespoon vanilla
1 cup flour
1/2 cup semisweet chocolate chips/dark chocolate chunks

Preheat the oven to 350 degrees.

Grease and flour an 8-inch baking pan, then set aside. Using a double boiler (can be made with two pots, one filled with boiling water) melt 4 ounces of the white chocolate together with the butter. Stir occasionally as it melts. Remove mixture from heat and add the remaining chocolate. Mixing it together should melt the rest of the white chocolate.

In a separate bowl, beat the eggs and sugar until pale and thick. Add the butter mixture to the egg mixture with the vanilla and flour. Beat until smooth, being careful not to over mix.

Add the chocolate chips and stir in by hand.

Pour into pan. Bake 35 minutes or until toothpick inserted in center comes out clean.

Cool in pan, on wire rack. Cut into squares. Serve.

March 29, 2011

Hamantaschen Part 2


Once you've made the dough and let it rest for several hours it's time to make your hamantaschen. Roll out part of the dough on a lightly floured surface, until it is about 1/8 of an inch thick. You don't want it so thin that it is slightly transparent, but a little thicker is fine. If you don't have a rolling pin, try using a thick glass, making sure to press down gently as you roll.


Using a glass/ measuring cup/two-inch circular object of your choice, cut out circles from the dough and set aside. Make the circles as close to each other as you can without overlapping to save time. Any remaining dough can be rerolled.


Take a small custard dish or bowl and fill it with water.


Take out desired filling(s).


Dip your index finger in the water and draw a circle around the top edges of a hamanataschen. Immediately add about a teaspoon or two of filling. If you add too much filling, you will be able to tell, because the hamantaschen will not close easily. Simply remove excess filling.


Essentially, what you will be doing is folding the edges of a circle into thirds.


Fold the top edge of the circle so that it covers the edge of the filling. Take more water and gently rub down the edges of the fold. The edges should nearly disappear into the cookie. Turn and fold remaining edges of the hamantaschen similarly two more times so that they overlap, making sure to use water to bind them together. There should be a well defined triangle of filling visible.


Move completed hamantaschen to a greased cookie sheet. Bake for 10-15 minutes until tops begin to turn brown. Cool on a baking rack.


Traditional fillings include poppy seed and other fruit fillings including prunes.


Jam Filling
Ingredients:
jam of your choice
chopped nuts


These fruit fillings can be easily made using different kind of jams. Be warned that the jam may bubble out of your hamantaschen, however. To keep this from happening, simply add a few finely chopped nuts to your jam in a small custard dish.


Poppy seed filling is a bit more complex. It is also my favorite kind of hamantaschen filling. This recipe does make a lot of it, however, so it should be made for a large party or if you only make one kind of filling, otherwise you may have a lot leftover. Poppy seed filling can also be bought at some supermarkets in the baking section, next to other canned pie fillings.


Poppy Seed Filling
(adapted from Jewish Holiday Kitchen )
Ingredients:
1/4 pound sugar
2 tablespoons water
1/4 pound poppy seeds
1/2 egg white
1/4 teaspoon vanilla
rind and juice of 1/2 lemon or orange
1 oz raisins
1/2 oz figs or dates or additional raisins
cinnamon to taste
1/2 cup raspberry jam
2 tablespoon butter


Combine the sugar and water in a pot. Simmer mixture over low heat.
Grind the poppy seeds in a food processor or blender.  Add to sugar mixture.

Add egg white, vanilla, lemon or orange rind and juice, raisins, figs, and cinnamon.  Simmer over low heat for 5 minutes.  


Add jam and butter and continue simmering until butter is melted and all ingredients are combined.  You can use the filling then or let it chill in refrigerator for 20 to 30 minutes until the filling becomes a bit firmer.
----


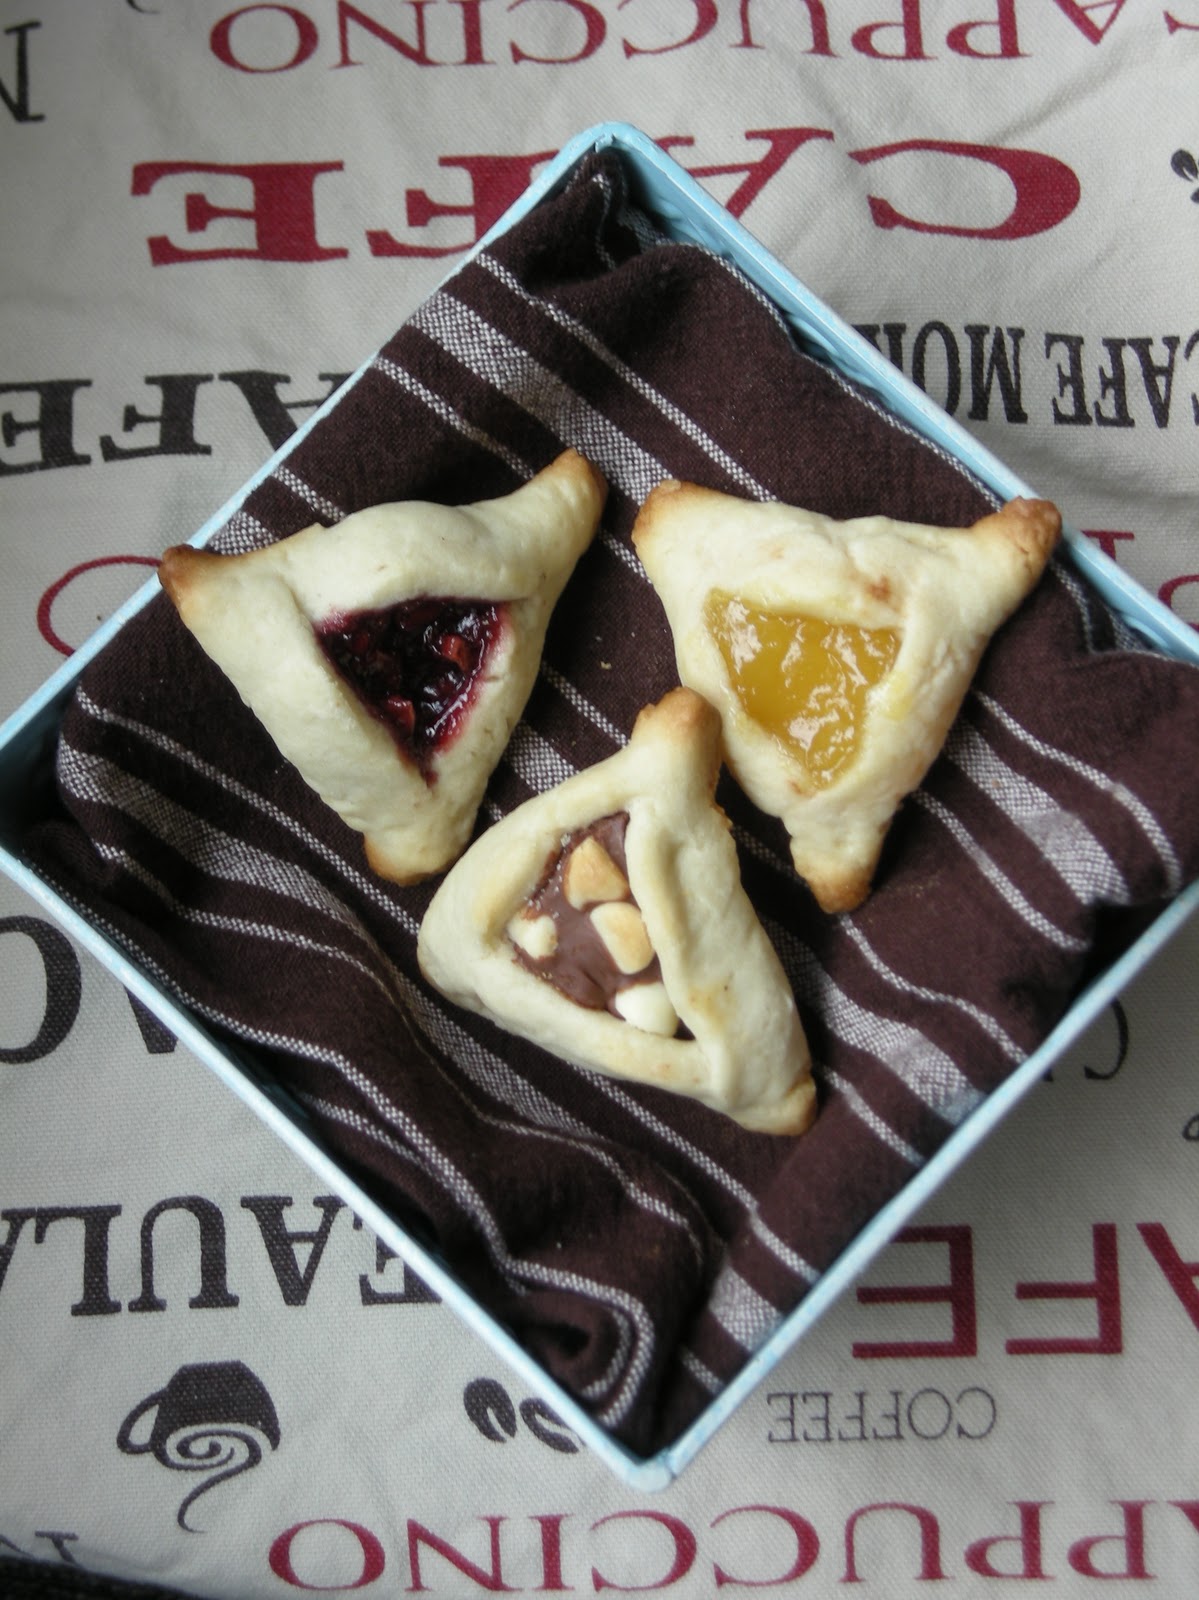
Now you're ready for the nontraditional fillings. Basically, the sky's the limit.


One of the interesting things about baking hamantaschen with friends who didn't grow up eating the traditional flavors is that they come up with something so blasphemous- like pumpkin pie hamantaschen- that you have to stare at them in shock and horror for several minutes.... Then totally do it.


And it turned out awesome.


Non-traditional Fillings:


Chocolate Options


Ingredients:


Chocolate Chips
Nutella


They both melt beautifully. Apply peanut butter when necessary. 
Chopped nuts as well.


---
Lemon Curd
Ingredients:
Lemon Curd Jar


Doesn't burn. Thank goodness. Add white chocolate chips for extra sweetness.


---
Pumpkin Pie Filling
Ingredients:
about 1/4 cup pumpkin puree
skim milk
dash or two of bootstrap molasses
generous pinch of cinnamon and ginger
dash of nutmeg 
(pumpkin pie spice works as well)


Combine all ingredients in a bowl and mix. You want to use just enough milk to wet the mixture without it becoming watery. 


This only makes enough for 3-4 hamantaschen, which if you've made it this far, you may find relieving, as you probably have started to wonder just how many batches of dough you'll need for all these fillings. 
If you want to make a larger batch of pumpkin filling, simply increase the amount of pumpkin and add a little extra of everything else.
---

Pop those hamantaschen in the oven for 10-15 minutes, at 375 degrees. Let cool 3-4 minutes.


Bite.  Chew.  


Smile.

March 23, 2011

Hamantaschen- Part 1

Hamantaschen. Traditional Purim cookies. I could go on about them for hours.


If the only hamantaschen you have ever consumed came from a grocery store, drop everything and get your apron ready. It's time to make the real stuff.


Normally, what you can find in the bakery section of your local supermarket is in reality a jam cookie with a basic sugar cookie base. This is not what hamantaschen are supposed to taste like. They are actually made from a thin, flaky, slightly sweetened dough. There is a wide range of filling options, from traditional to non-traditional. And furthermore, hamantaschen are meant to be shared and enjoyed by family and friends.


Every year, my parents and I would go to a hamantaschen making party. For me, this was the highlight of Purim and an essential part of the holiday. We would walk into the house, where the dough would be sitting out on long wooden tables. The adults would roll out the dough, which had been prepared by the host, while the children ran about, impatiently waiting with glass cups to cut the circles.


When the dough was prepared, we would then busy ourselves filling as many hamantaschen as we could, with as many different flavors as possible. Chocolate would always a favorite around the younger set, as well as peanut butter, and we were determined to make as many of our favorites as possible, knowing that they could very well be eaten as soon as we turned our backs.


Our hosts and some of the adults would whisk in and out of the rooms with large baking sheets. We would fill them up quickly with cookies and pop them into several ovens. As soon as they were done, they would be placed onto cooling racks, where they would inevibly be found and devoured, warm and delicious. As many hamantaschen as we ate, there were always more.


Eventually, the remainder would be packed up and we would take our spoils home.


So many different types of hamantashen fillings. Endless possibilities. Let's get started.


Hamantashen Dough
from Jewish Holiday Kitchen
(makes enough for 24-36 depending on size)


Ingredients:
2/3 cup butter or margarine
1/2 cup sugar
1 egg
3 tablespoons milk or water
1/2 teaspoon vanilla
2 1/2 to 3 cups sifted all-purpose flour


Cream butter and sugar. Add the egg and continue mixing until smooth. Add milk and vanilla. Stir in the shifted flour until a ball of dough is formed. 


If you do not have a dough hook or a food processor to help mix the dough, roll up your sleeves and wash your hands. Add the flour a little at a time, mixing with a spoon, scraping down the sides and making sure to incorporate all the flour from the bottom of the bowl. Continue adding flour, until mixture becomes harder to work with and stick your hands right in, adding more flour until it becomes a workable dough.


Once your dough is formed chill dough 2-3 hours or overnight.


The cookies will need to bake in the oven at 375 degrees. 


Proper folding technique will be discussed in a later post, as well as different kinds of fillings, both traditional and nontraditional.


Happy Purim Everyone!